Tuesday, May 19, 2015

Red Velvet Cake

A very good friend got a real job and is leaving the state.  When she invited a group of us over for a last hurrah, I offered to make dessert.  I wasn't sure what I was going to make, but then I saw this recipe for Red Velvet Cake while investigating the difference between white and red velvet cake.

 http://www.adamsextract.com/MediaKits/RedVelvetCake/Original%20Red%20Velvet%20Recipe%20Card.jpg

 I mentioned the possibility of making it and the response was EXTREMELY positive.  It seemed fitting, since it is a Texas recipe and this is about leaving Texas.

However, I did not want to the exact Adams recipe, because it involved buying several ingredients that I generally do not use.  I am not particularly confident about playing with this type of recipe because baking is more of a science than an art and it can go very, very wrong.  Very wrong.  Luckily, someone else modified the recipe for me at the New York Times.  The Ermine Icing was very intriguing to me. 

Red Velvet Cake

1/2 cup unsalted butter
3 tablespoons cocoa, divided
1 1/2 cups sugar
2 eggs
2 teaspoons vanilla
2 tablespoons red food coloring
1 teaspoon salt
1 teaspoon baking soda
2 1/2 cups flour, sifted
1 cup buttermilk (or 1 tablespoon vinegar and milk to 1 cup)
1 tablespoon vinegar

Ermine Icing

5 tablespoons flour
1 cup milk
1 teaspoon vanilla
pinch of salt
1 cup unsalted butter
1 cup granulated sugar
1 tablespoon white vinegar

1.)  Soften butter.

2.) Preheat oven to 350 degrees farenheit.

3.) Butter and cocoa two or three 9-inch cake pans.  Be sure to get the edges/corners.  Use one of the three tablespoons cocoa.  You can technically butter and flour the pan, or spray it with baking spray, but the outside will have white splotches which is not pretty (but will be covered by icing anyway).

4.) Cream butter and sugar.  Add the eggs, mixing after each addition.  Add vanilla.


5.) In a small bowl, mix the last two tablespoons of cocoa with the red food coloring. Add to the butter mixture.


6.) Sift together the flour, baking soda, and salt. 

7.)  Alternate additions of the buttermilk and the dry ingredients.  I used about a third of the flour at a time and half the buttermilk.


8.)  Divide the batter evenly between the pans. 


9.)  Bake until a toothpick inserted in the center comes out clean, about 20-25 minutes (if you used two pans like me, instead of three, it could take more than 25 minutes). 


10.)  While the cakes are baking, make the cooked flour part of the Ermine Icing.
           a.) Whisk the flour into the milk in a saucepan.  Cook on medium heat (keep it simmering),     
                 until it is a pudding-like consistency.


          b.) Remove from the heat and add the vanilla and salt. 
           c.) Put the mixture in another bowl. Cover with plastic wrap. Make sure the whole surface is
                 covered.


          d.)  Cool completely.

11.) Cool the cakes in their pans.  COMPLETELY.  I was impatient about this and regretted it after I frosted the cake.

12.)  Continue the icing after the flour mixture has cooled completely. 
            a.)  Cream the butter and sugar.


            b.)  Add the flour mixture in small batches.

            c.) Keep beating the mixture until it is light and fluffy, like whipped cream.


13.) Assemble and frost the cake.  Not when it is hot, like I did, or the frosting will melt in the middle and the cake will shift in transit.  I was very unhappy (but it still tasted wonderful).


I can't quite describe the icing, but it was so good.  It tasted almost like whipped cream.  Lovely.

There were after pictures, but I don't know what happened to them.  If they were here, you could see the destruction that happened as I drove the cake to my friend's house.  It was super disappointing.  However, the cake was NOT super disappointing.  I ate it for breakfast two days later.

Monday, May 11, 2015

Lemon Bundt Cake

Spring is the season of fruit for me.  Even though fruit has different seasons, I want all the fruit in the spring.  All the fruit.

We have an end of the year writing center party around finals week every year.  I bring a dessert, because that is sort of my thing. Someone else was bringing chocolate, so I decided to bring lemon cupcakes.  What is that you say?  This is not a recipe for cupcakes?  You are correct.  I changed my mind.  I think part of it was a desire to have orange chiffon cake which was my grandmother's favorite cake, but being too lazy to make that complicated a cake---and not having the correct pan.  The next best thing?  Bundt cake.  Always a winner.

I couldn't find a recipe that I really liked, partially because I was bound and determined to use lemon greek yogurt in it after I bought three cups of it accidentally (don't ask how).  I decided to use a modified version of this Luscious Lemon Sour Cream Cake recipe.


Lemon Bundt Cake

1 package white cake mix with pudding
3 tablespoons butter, softened
2 containers of lemon greek yogurt (I used yoplait 100 calorie lemon)
1/2 cup egg beaters
1/3 cup milk
2 tablespoons lemon juice
zest of one lemon
1 teaspoon lemon extract

1.) Preheat oven to 350 degrees Fahrenheit.  Spray a bundt pan (I used 12 cup, but a 10 cup would be better) with baking spray.

2.)  Combine wet ingredients.

3.)  Add cake mix.

4.) Spoon into prepared bundt pan.

5.) Bake until a toothpick or cake tester inserted into the center comes out clean.

6.)  Cool for 15 minutes before removing the cake from the pan.


I glazed the finished bundt with a lemon glaze.  All I did was mix lemon juice into half a cup of powdered sugar until it was the right consistency. 


My ultimate plan was to serve this with strawberries and homemade whipped.  I did serve it with strawberries, but I went to the store three times to buy whipping cream and came home each time with lemon yogurt.  No whipped cream.  It was a lovely cake, though!

Monday, May 4, 2015

Rummy Banana Coconut Bread

Note the title of this is RUMMY, not Remy.  By this distinction, I mean to note that I put a lot of rum in the banana bread; I did not put my dog in it, nor is my dog the maker of the recipe.  Just for clarification.

Last week, I was just thinking about having complete control of the kitchen again.  It is all mine now that my roommate moved in with her boyfriend and I have filled it with my things (but not my silverware which I cannot find--this is an interesting problem to have).  I wanted to make all the things.  Just all of them.  I was talking to another tutor in the Writing Center right outside the administrator's office (rude, I know, but that is where we congregate).  Just in passing, I mentioned the possibility of making coconut banana bread in celebration of the end of the semester.  Our administrator turned around and said "Coconut banana bread?" and then I decided it was now a done deal.  I had to make it if it caught someone's attention in another room when I wasn't even talking to that person. So I did.

I make variations of this recipe, based on Chocolate Covered Katie's Polka Dot Banana Bread, all the time.  I posted a Nutella swirled banana muffin recipe a while ago.  However, this one is a little different...and it is bread instead of muffins.  I just felt like using my loaf pan (all the things, remember?).


Rummy Banana Coconut Bread

1 1/2 cups flour
1/2 cup oatmeal
1/2 cup coconut
1 tsp baking soda
3/4 tsp baking powder
3/4 tsp salt
dash of cinnamon
1 container coconut vanilla greek yogurt
2 1/2-3 ripe bananas (I used frozen which is how 2 1/2 worked)
1/2 cup sweetener (agave, honey, maple syrup...I mixed agave and honey)
1 1/2 tbls lemon juice
1/4 cup rum (I know...it is a lot.  I didn't intend for it to be...but it just happened and it was good!)
1/2 cup chocolate chips

1.) Preheat oven to 350 degrees Fahrenheit.  Spray loaf pan.
2.)  Mix dry ingredients together in a medium bowl .

3.) Mix wet ingredients together in a small bowl.  (I may have gone too small.)


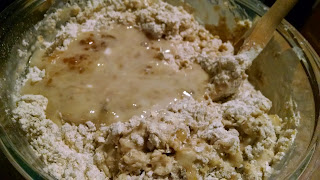
4.)  Fold wet into dry.  I did it in batches of approximately 1/3 off the wet ingredients. Do not overmix.

5.) Fold in chocolate chips.

6.)  Spread evenly into prepared loaf pan.  I like glass pans better than metal; this one is especially nice because of the lovely handles.  It is cobalt too (my favorite), but you cannot really see that with the black stove beneath it.


7.)  Bake until a skewer inserted into the middle comes out clean.  It took mine approximately 40 minutes.  I could take up to an hour depending on your pan, oven temperature, etc.


I took this straight over to the writing center while it was still hot, so I don't have any pictures of the sliced bread.  It was very good though.